За замовчуванням iTunes або Finder робить резервні копії пристроїв iOS у глибоко захованій папці на внутрішньому диску. Немає конкретного налаштування, яке можна ввімкнути та вибрати інше місце. Ці резервні копії можуть мати кілька гігабайт. Таким чином, для кращого управління сховищем, можливо, ви захочете змінити місце резервного копіювання iPhone на своєму Mac або ПК. Дозвольте мені показати вам, як можна перемістити місце резервного копіювання iOS за замовчуванням.
- Змінити місце резервного копіювання iPhone на Mac під управлінням macOS Catalina або пізнішої версії
- Відновіть папку резервної копії iPhone до початкового розташування на Mac
- Змінення розташування резервної копії iTunes за допомогою iPhone Backup Extractor
- Вже змінили розташування резервної копії iTunes, але не можете побачити резервну копію?
- Як змінити розташування резервної копії iTunes iOS на ПК з Windows
Змінити місце резервного копіювання iPhone на Mac під управлінням macOS Catalina або пізнішої версії
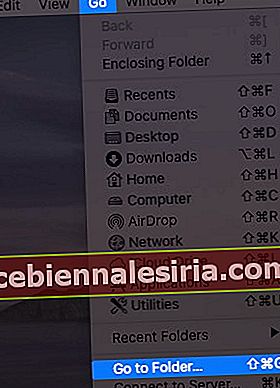
- У верхній панелі меню натисніть Перейти → Перейти до папки ... Введіть або скопіюйте цю точну адресу ~ / Бібліотека / Підтримка програм / MobileSync.

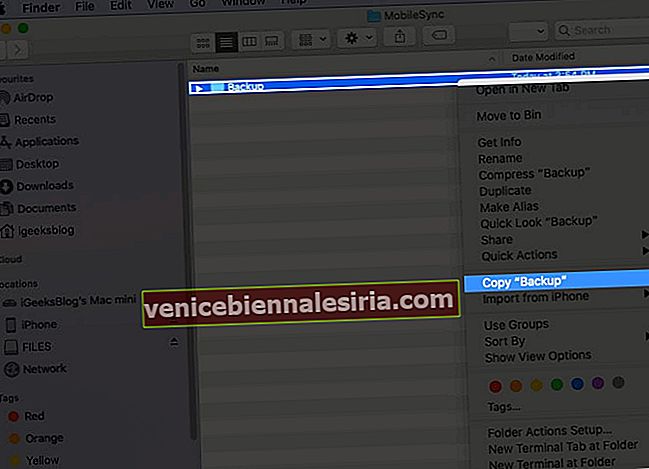
- Ви знаходитесь там, де ваш Mac за замовчуванням робить резервні копії. Клацніть правою кнопкою миші папку Резервне копіювання та виберіть Копіювати “Резервна копія” .
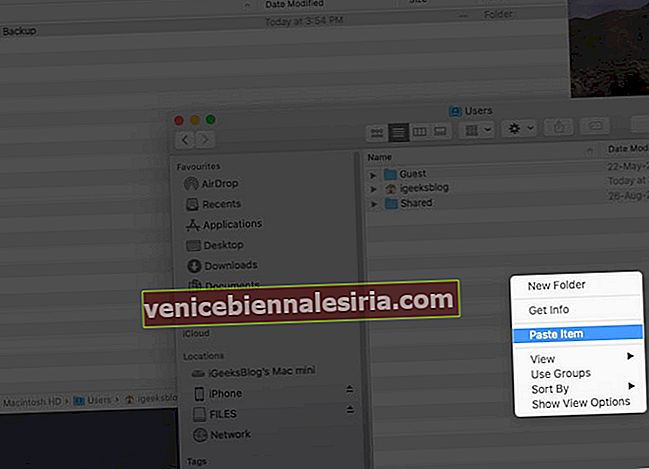
- Тепер (відкрийте друге вікно Finder і) перейдіть до місця, де ви хочете створити нову папку резервної копії iPhone. Це може бути робочий стіл, документи, нова папка десь. Коли ви знаходитесь у цьому місці, клацніть правою кнопкою миші та виберіть Вставити елемент . Нехай завершиться процес копіювання поточної папки Backup у це нове місце. Залиште це вікно Finder відкритим. Це вам знадобиться на кроці 6 нижче.
- Після копіювання поверніться до першого вікна Finder (~ / Library / Application Support / MobileSync), клацніть правою кнопкою миші папку Backup і виберіть Rename (або виберіть папку та натисніть клавішу Enter).
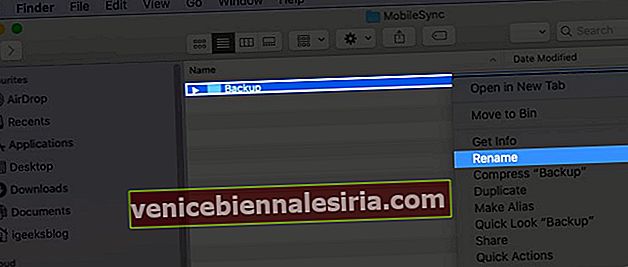 Тепер додайте .old до імені файлу. Як результат, назва цієї папки буде виглядати як Backup.old
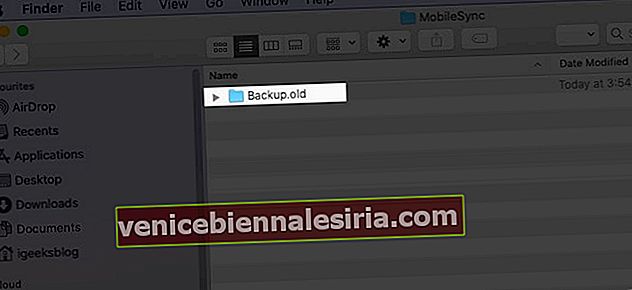
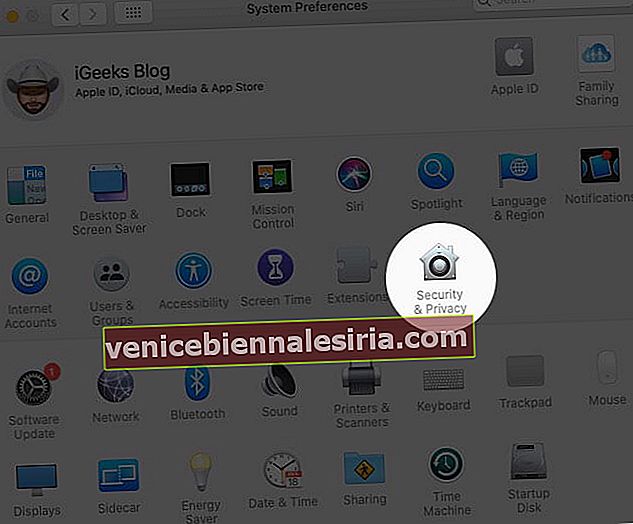
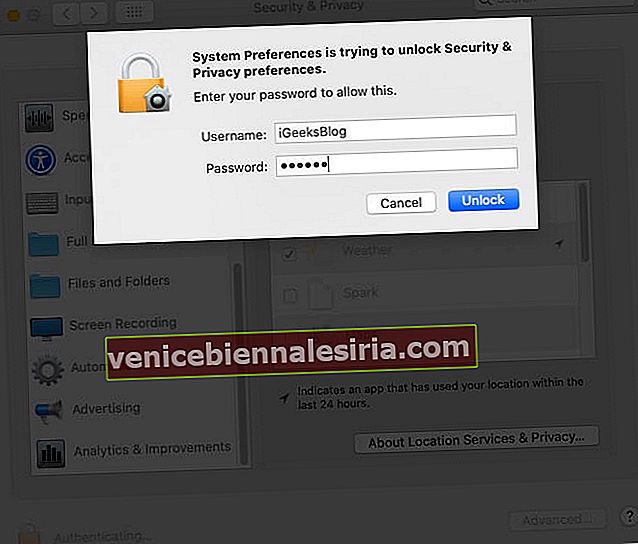
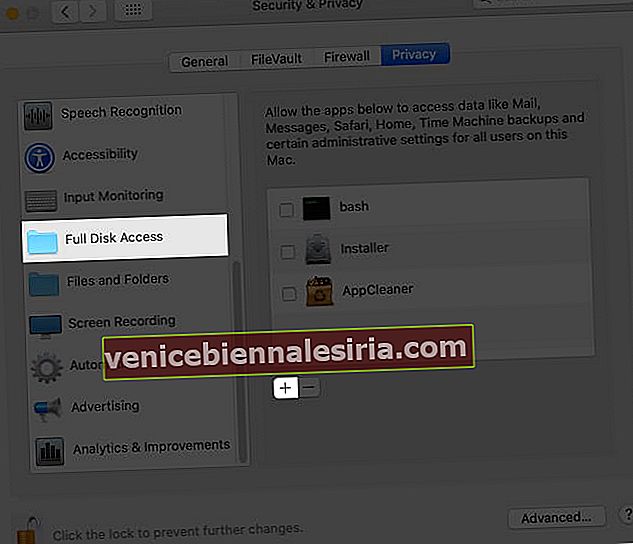
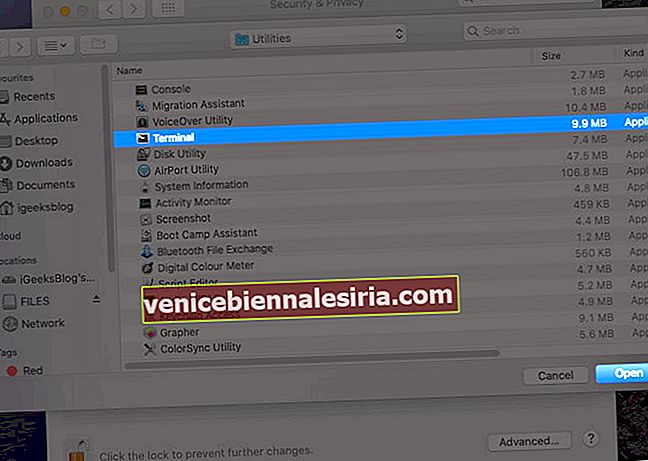
- У верхньому лівому куті натисніть логотип Apple → Системні налаштування → Безпека та конфіденційність → вкладка Конфіденційність → клацніть піктограму замка та введіть пароль свого Mac, щоб продовжити. Тепер на лівій бічній панелі натисніть Повний доступ до диска → натисніть на крихітний значок плюс ( + ). У папці Додаток → Службові програми → виберіть Термінал і натисніть Відкрити . Після цього ви можете ще раз натиснути на піктограму замка і закрити це вікно.

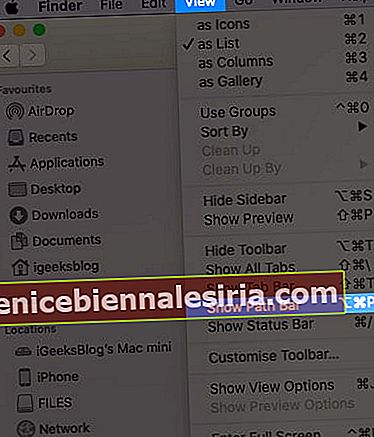
- Тепер ви повинні знати точне розташування нової папки Резервне копіювання. Для цього у вікні Finder натисніть на View у верхній панелі та виберіть Show Path Bar . Знизу ви побачите тонкий рядок, який повідомляє вам точне розташування цієї нової папки Резервне копіювання. Тримайте це вікно відкритим.

- Натисніть Command + пробіл , знайдіть термінал і відкрийте його. Далі вам потрібно відредагувати таку команду, яка відповідає вашому комп’ютеру, а потім ввести / вставити її у вікно терміналу.
ln -s /Volumes/Drive/Backup/ ~/Library/Application\ Support/MobileSync/ - Дуже важливо: Редагування наведеної вище команди: Відкрийте звичайну програму для блокнотів або веб-сайт, наприклад editpad.org. Тепер скопіюйте наведену команду та вставте її туди. Потім вам слід замінити / Volumes / Drive / Backup / на розташування вашої папки Backup.
Наприклад, див. Знімок екрана вище. Розташування моєї папки Backup - Macintosh HD → Користувачі → Резервне копіювання . Тож команда буде виглядати так:
ln -s /Volumes/Macintosh\ HD/Users/Backup/ ~/Library/Application\ Support/MobileSync/Якщо назва місця містить дві або більше частин / слів, таких як Macintosh HD, вам слід поставити зворотну скісну риску та єдиний пробіл. Наприклад, Macintosh \ HD
ln -s /Volumes/Donald/Backup/ ~/Library/Application\ Support/MobileSync/ln -s /Volumes/Donald/iPhone/Backup/ ~/Library/Application\ Support/MobileSync/Now, you know how to change the path address in the command. Next, let us make use of it.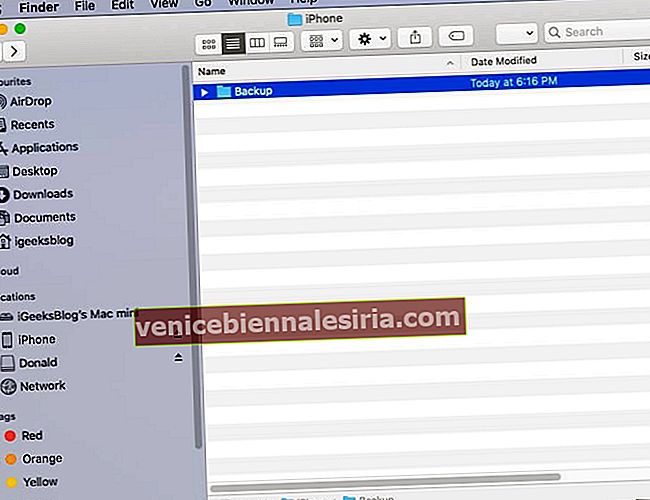
Copy the final command, paste it in the Terminal, and press the enter key.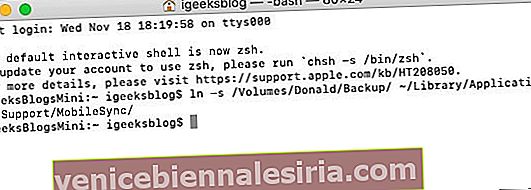 Tip: Now, when you go to the original Backup.old Finder window, you will see a new folder named Backup, which will have a small arrow on it.
Finally, open Finder on your Mac, connect the iPhone, Trust it, and click on Back Up Now. The backup would be made and saved at the new location.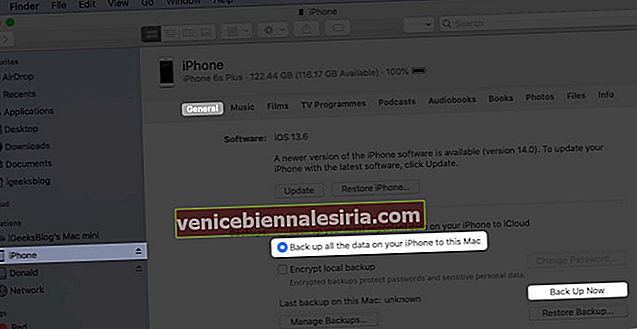


 Тепер додайте .old до імені файлу. Як результат, назва цієї папки буде виглядати як Backup.old


 Tip: Now, when you go to the original Backup.old Finder window, you will see a new folder named Backup, which will have a small arrow on it.
Notes:
Optional: After you complete the first backup at the new location, you may choose to delete the Backup.old folder. This may free significant space on your Mac.If you opted to back up your iPhone to an external drive, make sure you connect it to the Mac before hitting Back Up Now in the future.
Restore iPhone Backup Folder to its Original Location on Mac
From the Finder window, click on Go → Go to Folder → and enter this location ~/Library/Application Support/MobileSyncRight-click on the folder with an arrow icon and select Move to Bin.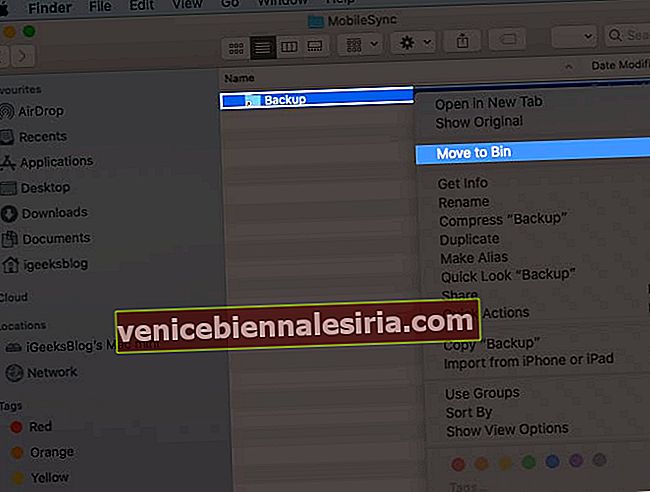
Now, for safety, drag (or copy-paste) the current Backup folder to this location. All future iPhone backups will be saved here, like before. Even if you do not follow this step, the next time you make the device backup, a new folder named Backup will automatically be created.

Do you not want to follow the lengthy process above? Well, here is the most straightforward way to change the iTunes/Finder iPhone backup location on Mac.
How to Change iTunes Backup Location Using iPhone Backup Extractor
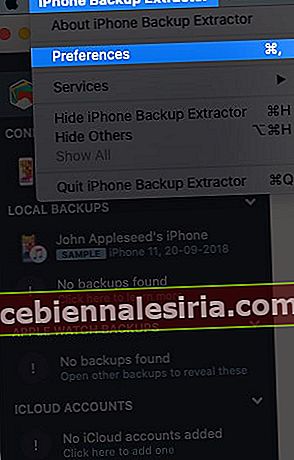
Download iPhone Backup Extractor for free and complete the installation.Important: First time, you may have to open the System Preferences → Security & Privacy → Privacy tab → click on the padlockicon, and enter your Mac’s password. Now, click on Full Disk Access and then the plus sign (+). Next, select iPhone Backup Extractor and click Open.
Now come back to the iPhone Backup Extractor app window. (If needed, click on ‘OK, I’ve made this change, let’s restart the app to continue!’) From the top menu bar, click on iPhone Backup Extractor → Preferences → Backups → Change. Now, you may see a popup saying ‘Backup contains data.’ Click on ‘Open.’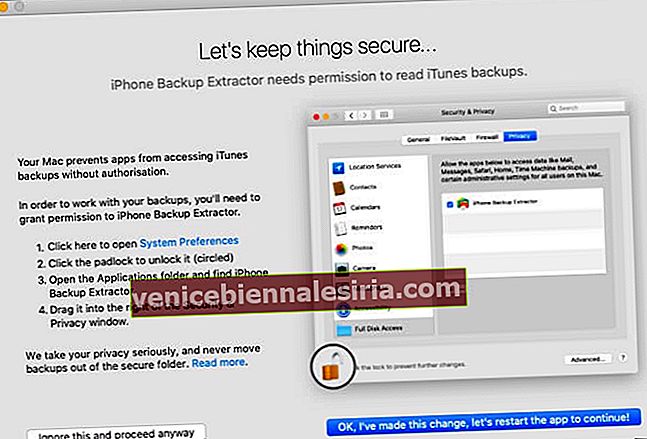
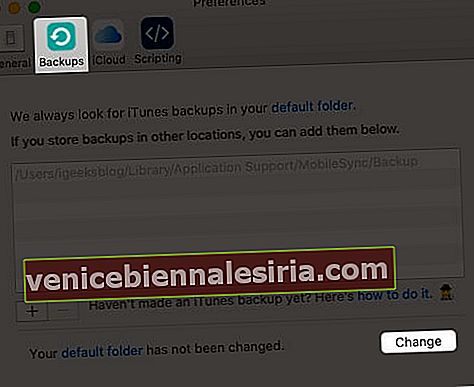
From here, drag the folder with a lengthy name like 149652….. to someplace else, like the Desktop.After that, inside the iPhone Backup Extractor app, click on Change and Select the desired folder.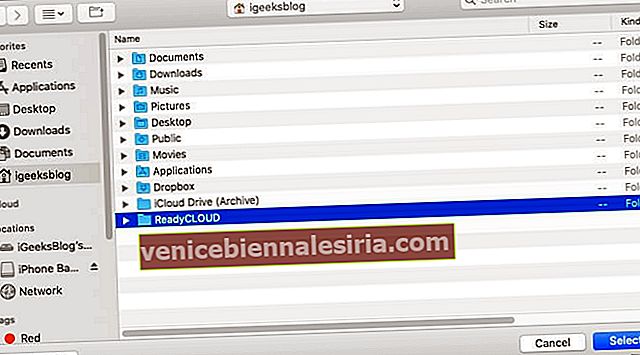


Done! You have successfully changed the iPhone backup folder in just a few steps. To undo this change, click on Revert.
Already Changed iTunes Backup Location But Unable to See the Backup?
Even after you have correctly followed the above steps and are unable to find the backup, then we have a separate guide that has you covered.
Most of the time, if you follow the first manual step, the problem arises due to the wrong location address of the new Backup folder. You must get that right. If this is wrong, go to ~/Library/Application Support/MobileSync and you will see a white Backup symlink instead of a blue folder named Backup with an arrow.
How to Change the iTunes Backup Location on Windows PC
As iTunes won’t let you change it, you need to make way through a symbolic link. Also known as a symlink, it’s a bridge that connects two folders with the same name. Using a symlink, you can direct iTunes to back up data to a dummy folder that you’ll have to create. However, you’ll have to enter some commands in the “Run As Administrator” window. Just make sure that you create a dummy folder in a drive with enough storage space. Like, we created it in D:\. Let’s get started by creating a folder first.
Create a folder named “MobileSync” in the D:\ (d stands for drive) on your computer.To view the by-default location, go to C:\Users\UserName\Apple\MobileSync if you have downloaded iTunes from Windows 10 Store. For the old desktop version, you need to go to C:\Users\UserName\AppData\Roaming\Apple Computer\MobileSyncCut and paste the Backup folder to the new MobileSync folder that you’ve created in D:\Now, run CMD as administrator. To do so, press Windows + R keys together, then type cmd in the search field.Press Ctrl + Shift + Enter to run it as in the administrator.Enter the command mentioned below.
If you’ve downloaded iTunes from the Microsoft store. MkLink /J “C:\Users\UserName\Apple\MobileSync\Backup” “D:\MobileSync\Backup
Enter this code MkLink /J “C:\Users\UserName\AppData\Roaming\Apple Computer\MobileSync\Backup” “D:\MobileSync\Backup” if using the older version.
Now when you back up your iPhone using iTunes, the data will be stored in the D:\MobileSync\Backup folder. Try backing up your iPhone and check if the Backup folder in the D:\ is configured correctly.
iPhone Backup Location Changed Successfully!
This is how you can have new iOS or iPadOS backups to a different location. Changing to some other folder on the same internal disk makes little sense. But doing the same on an external disk frees space on your internal disk.
I hope the above guide was helpful. In case you are facing difficulty at any step, feel free to reach us via the comments section below.
You may also like to read:
Find iPhone Backup Location on Mac and Windows PC3 Ways to Check Folder Size on MacHow to Use Control Center in macOS Big SurHow to Backup and Install iPhone Apps from Mac/Windows Without iTunes


![Кращі кейси для iPad 2018 року [Видання 2021]](https://pic.venicebiennalesiria.com/wp-content/uploads/blog/1258/3KZA60KIXOpic.jpg)